Announcement

Collapse
No announcement yet.

Hood frame component question

Collapse
X
 
  • Filter
  • Time
  • Show
Clear All
new posts

    Hood frame component question


    I wonder if someone could look at their hood frame and confirm something for me please.

    I've obtained a good condition head rail (ie the bit that fastens to the top of the windscreen) together with the 2 hinging sections that pass above the doors.

    I've just removed the old rail together with the old hinged bits. The side bits are about 43 cm long and terminate about roughly halfway along the top of the side window.

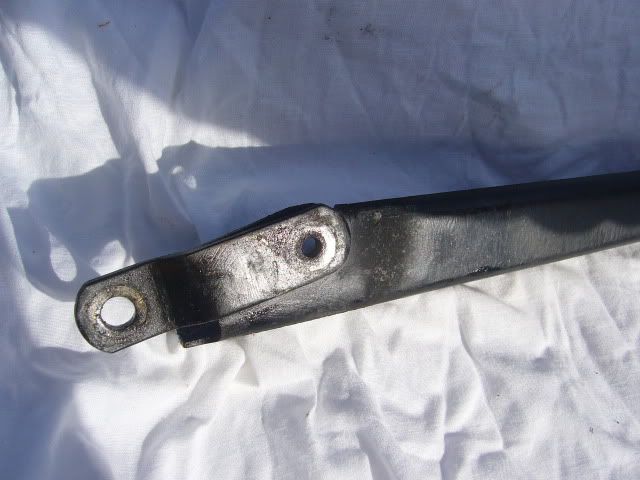
    Now here's the confusion...coming off the rear end of the side rails is a short (8cm) cranked joining piece. (See pic) On the replacement I have obtained this cranked piece is bolted to the side rail and would thus rotate. On the rails I've just pulled off its welded on but still retains the bolt hole as this is utilised by another piece.

    If it helps mine is a 1976 MkII and I suspect the replacement is off a MKI

    Any advice gratefully accepted

    Ta

    David


    #2
    imported post

    Here is one I prepared earlier

    Does that help?
    Attached Files

    Comment


      #3
      imported post

      Thanks for thatChris

      Can you confirm whether or not the long arm of that cranked component on the right of the photo is, or should be welded to the arm that runs up to the head rail.

      Regards

      David

      Comment


        #4
        imported post

        Yes, it should be welded to stop it rotating separately to the arm, but the weld is only small, in one spot and it often breaks and then needs rewelding. If you dont have a welder you will have to pin it.

        Comment


          #5
          imported post

          Chris

          Many thanks for the advice and the photo was handy as well. Frame back together now and just in process of replacing channeling and seals etc

          David

          Comment


            #6
            imported post

            Thinking ahead. Re-assembling my hood frame is a job coming up soon.
            As I recall when dismantling it in the first place there seemed to be no logic or attempt by the designers to simplify the diversity of bolt variants used, different lenghts overall, different shoulder lengths and different spacer or washer thicknesses.
            Now I measured everything, but as I believe I was not the first to strip and reassemble the frame I cannot gaurantee what I was measureing was in the right place.
            Has anyone got a definitive 'this bolt, this size with this washer goes here?

            John

            Comment


              #7
              imported post

              Yes John...having reassembled it I know what you mean. Someone must have had a right go in the past ....a lot of the shoulder bolts had been distorted and are not far off stripping. I intend to try and progressively replace them so a list would be helpful

              Comment


                #8
                imported post

                Hi John,

                Have you looked on the Rimmers' site? Although it doesn't give exact dimensions. I wonder if the chart and the descriptions underneath might help you?

                http://www.rimmerbros.co.uk/Item--i-GRID005489

                Comment


                  #9
                  imported post


                  Yes its bad design: nearly all the bolts are different.

                  If you have not got the right size shouldered bolt, or your old one is bad, get some steel tubing 3/8 o/d,approx 1/4 I/D you can cut this to the length required. Then use standard 1/4 UNF setscrews or bolts with the tubing. This works well and is stronger (and cheaper) than theshouldered bolts (because shouldered bolts are undercut in the machining process just where there is a weak point!). Make sure youshim carefully(with washers)to get a nice snug fit and no rattles.

                  Comment


                    #10
                    imported post

                    Rimmers do have thier uses, I remember the diagram clearly.

                    I thought why are these bolts made in steel and expected to act as a bearing material in a steel frame. No wonder the hood is so difficult to erect and why bolts seize and shear.

                    Refering to Rimmer diagram I decided to measure each bolt with the aim of reproducing them at some time in St.St. or a bronze alloy.
                    See attached drawing, all I've got to do is find the one I filled out!

                    Vmad's option is worth looking into, could the tube be a bearing material? The bolts could be hex socket button head st.st. bolts or setscrews to improve the appearance, better than screw driver slots anyway and much better than the hex head replacements I recieved years ago.

                    John4d
                    Attached Files

                    Comment


                      #11
                      imported post

                      Methodical or what! Just got to remember what I was thinking at the time.
                      John
                      Attached Files

                      Comment


                        #12
                        imported post

                        Well laugh out loud!
                        I've found a print of a previous encarnation of the bolt drawing with the dimensions I took.... dated 13/12/1995! If anyone is interested I'll try to find the electronic original and post it.
                        I was young enough to look cool in a stag in those days, just at the start of my second childhood. When does that end by the way?
                        John4d

                        Comment


                          #13
                          imported post

                          John,
                          I would be interested in your completed drawing this would be a major help to owners.
                          BTW it never ends.
                          Stuart

                          Comment


                            #14
                            imported post

                            V Mad wrote:

                            Yes its bad design: nearly all the bolts are different.

                            If you have not got the right size shouldered bolt, or your old one is bad, get some steel tubing 3/8 o/d,approx 1/4 I/D you can cut this to the length required. Then use standard 1/4 UNF setscrews or bolts with the tubing. This works well and is stronger (and cheaper) than theshouldered bolts (because shouldered bolts are undercut in the machining process just where there is a weak point!). Make sure youshim carefully (with washers)to get a nice snug fit and no rattles.
                            I agree with Chris, except Iturnedbushes from phosphor bronze on a lathe. These were grooved and drilled to accept and hold grease. I turned the bushes individually as I found too much variance in the hole diameters in the frame. I alsoused high tensile pan head set screws. To secure the screws I used half height nyloc nuts. Between the frames and under the screwheads,I used the "wavy" type shake proof washers. It was a long process but I now have a very smoothly operating roof, easy enough for my kids to open or close, or my wife with no broken nails! With no rattles.

                            I appreciate, it is over engineered but I cannow rely on it!

                            regards,

                            Raoul

                            Comment

                            canli bahis siteleri bahis siteleri ecebet.net
                            Chad fucks Amara Romanis ass on his top ?????????????? ???? ?????? ?????? ? ??????? fotos de hombres mostrando el pene
                            güvenilir bahis siteleri
                            Working...
                            X